In search of perfect beef rendang

Of all iconic beef stews around the world, beef rendang is the one closest to my heart. I have lived in Indonesia for a few years, on the island of Sumatra (or should I say Sumatera?) where this dish has its origin as a way to preserve beef.
Heavy on the spices, traditional beef rendang is supposed to keep for days, without refrigeration, at tropical room temperatures. There are stories of mothers preparing the dish and sending it to their student children by post, with the instructions to reheat on arrival – and the dish arriving in a state suitable for human consumption. Most importantly, it’s delicious.

As the dish spread and gained popularity, it has been adopted and changed by many people and everyone cooks it in their own way. I, too, have cooked the dish many times – always aiming for the taste I remember, the taste that in my mind it should have. There is no such thing as the One True Authentic Recipe for this dish, but there are plenty of opinions about it. Just look up rendang recipes on the Internet, and you will find swathes of people having an opinion on what the dish is, and on what it isn’t. And there seems to be some sort of consensus amongst them; most importantly that beef rendang cooked by others is not the real thing (and surprisingly often, that is indeed the case).

What rendang isn’t: Avoiding mistakes in style

Before we move on to what beef rendang is, let’s get straight about what it isn’t.

First of all, rendang isn’t Malaysian food any more than a full English breakfast is Irish. Rendang has its origin in Minangkabau, Sumatra. Rendang isn’t Thai food, so do not use plum sauce, fish sauce or cilantro in there. Rendang isn’t Chinese food either – avoid the soy sauce, and you do want galangal root in there rather than just ginger.

The most renowned in Indonesia is Rendang Padang (Padang style rendang). And let’s set the record straight. Padang style rendang isn’t mild. Think 100 grams of dried chillipeppers per kilo of meat – 1 part per 10. Or perhaps you like it a bit hotter at 300 grams worth of chillies per kilo of meat? How much chilli heat is in there depends on one’s tolerance, but without peppers, rendang isn’t rendang. You’ll see recipes vary wildly in this regard, but even given the varying proportions, the peppers clearly bring more to the dish than mere heat – even when ignoring the heat factor, the character of the dish depends on having peppers in there.

Traditional rendang isn’t vegetarian – it’s best made with beef, which brings a fairly strong taste to the dish and managed to hold its own amongst the heavy spice mix. Yet, the spice mix plays such a prominent role in the dish that the beef is easily replaced by goat, chicken or pork – or indeed potato, mushrooms or young jackfruit – in which case, you can use a bit of yeast extract (marmite!) to give the broth a beefier flavour.

Traditional rendang isn’t a soup. If you’d describe the sauce as liquid, you have made a kari – which is nice, but you’re not done cooking yet.

kariKari is not rendang.

Traditional rendang isn’t an Indian-style curry. If you have chunks of beef in a thick sauce that you could serve with a ladle, you have made a kalio – this too is nice, but you’re still not done cooking yet.

kalioKalio is not rendang.

Traditional rendang isn’t burned, roasted or toasted. Completely dry or almost completely dry is fine, but you don’t want to develop a crust on the meat. At the end of the cooking process you want to go very, very slow. Occasionally you may need to add a bit of water and take your rendang back to kalio stage to prevent it from toasting. As you will have understood by now, rendang isn’t a dish to cook if you’re in a hurry. It takes quite a bit of time to get the meat tender and develop the flavour. Some recipes call for cooking it a few times, several mornings in a row, which helps gives it its coveted near-black appearance.

rendangEntering rendang territory.

What rendang is

According to the Great Dictionary of the Indonesian Language, rendang is “meat which is curried with coconut milk until the sauce is altogether dry, what remains is only pieces of meat with their seasoning”. Even the Malaysian dictionary agrees – rendang, as a verb, is “cooking until dry with coconut milk”.

Ingredients

Next, let’s go through a list of ingredients commonly listed in rendang recipes.

Beef

The recommended cut is chuck (Indonesian: senkel, Dutch: Schenkel) – the front shoulder of the cow. I’ve found brisket to work well too. Cut it quite chunky – too small and it will fall apart too easily in the lengthy cooking process.

Coconut

Any old industrially processed coconut will taste like coconut, but avoid dessicated coconut. Coconut cream blocks work. Tinned coconut cream works better. But proper old coconuts give the best flavour and range of textures for the dish. Old coconuts are the easiest kind to find in the West – the hairy kind, not labelled “young” is what you’re looking for. Not only are you likely to find old coconuts; some of them may even be past their prime. When buying coconuts, choose coconuts that feel heavy and slosh when you shake them. This is an indicator that they aren’t so old that they have dried out and gone soapy.

Most rendang recipes call for two or three coconuts per kilo of meat. I find two is plenty.

One of the three eyes of the coconut is soft. Puncture it with a kebab skewer and let the coconut water drip out. Hit the coconut with a hammer around its equator of the coconut until it cracks open. Remove the flesh and grate or put in a food processor and chop as small as it goes. Add a cup of boiling hot water. Squeeze out, separating the coconut solids from the coconut milk. Toast the coconut solids on low heat (or in the oven, 80°C/175°F) until completely dry. When you leave the coconut milk to stand, it will separate into the thicker coconut cream, which will float on top, and thinner coconut milk at the bottom.
coconut_processed
For rendang, toast some of the dry coconut solids until light brown and fragrant; the resulting toasted coconut is called kerisik and gives the dish an additional layer of flavour and texture.

Onion (bawang)

The kind of onion typically used in Indonesian cooking is the small, red shallot, and called “red onion” when translated literally from the Indonesian term “bawang merah”, and garlic, or “bawang putih”, which literally translates to “white onion”. The main thing to keep in mind here is the size and proportion of these ingredients. Indonesian red onions are just a bit bigger than a chunky clove or two of garlic. As long as proportion between onion and garlic is kept in mind, I find medium sized onions (approx. 100 grams) work reasonably well, red onion works a bit better – but for the most authentic results, I get my small red shallots at my local Asian supermarket.

onion_garlic

Chillies (cabe)

Rendang recipes will use chillies – lots of them. If 300 grams mixed chillies per kilo of meat is too much for you, tone things down a bit so that your rendang experience matches that of the locals with a higher heat tolerance. Typically rendang uses lombok (your average long chilli pepper, which is relatively mild), cabe rawit (very hot birds-eye chillies) and cabe keriting (dried lombok).

Thai_peppersCabe rawit

Your heat tolerance is likely a bit lower than that of the natives. Don’t be tempted to leave out the chillies altogether. Just look at many there are in there; they will not only bring heat to the dish, but also lots of flavour. If you must tone things down, start by de-seeding the chillies, then change the blend to contain milder chillies. Worst case, use red bell peppers instead of chilli peppers. Without a good kick, it won’t be a proper rendang, in my book, but at least it will still be tasty.

Cumin (jintan)

An essential flavour in rendang. Do not leave out. Use whole seeds, toasted, about a tablespoon per kilo of meat.

Ginger / galangal (jahe / laos or lengkuas)

These are ALWAYS used together in rendang. Do not use powdered; either fresh or frozen ginger and galangal root will give a much more vibrant flavour. Galangal is a major flavour component of rendang, do not leave it out. If you use ginger only, this will be a guarantee that the dish won’t taste like the real thing. Crush the galangal before use.

ginger_galangalLeft: Ginger / Jahe, right: Galangal / Laos/ Lengkuas

Lemon grass (sereh)

Use 2 stalks of fresh lemon grass, crushed. Do not use powdered lemon grass, it’s pointless.

No tamarind (asam vs. asam kandis)

Rendang recipes might call for tamarind. Do you use tamarind in the pod, from a pressed block or syrup? The answer is neither. The Indonesian word for tamarind is “asam” which also means “sour”. The sour component of rendang however is often not “asam” but “asam kandis”, the seed of Garcinia xanthochymus, related to the mangosteen family. You may not be able to find this. In your local Indian supermarket, you may be able to find Garcinia indica by the name of kokkum, kokam or black mangosteen, which can be used as a substitute.

asamsAsam kandis (Garcinia xanthochymus) is not available where I live,
but kokam (Garcinia indica) gives a bit more authentic taste than tamarind concentrate

Khaffir lime leaf (daun jeruk purut)

Add a few khaffir lime leaves. They push your rendang towards that authentic flavour. If you can, use fresh or frozen rather than dried lime leaves, the difference is remarkable.

Bay leaf / salam

You’ll be forgiven for using bay leaf. It’s both a common substitute and a common translation for daun salam. They serve a similar purpose and even look alike. They are however not the same thing. Bay leaf (Laurus nobilis) has a flavour which reminds a bit of eucalyptus. Salam (Syzygium polyanthum), on the other hand, has a flavour which reminds a bit more of tea leaves.

salam_vs_bayLeft: Salam leaves, right: Bay leaves.

Turmeric

Plenty of rendang recipes call for turmeric – both original Indonesian recipes and translations. There is one problem with turmeric: it prevents the dish from developing its trademark blackened colour. When in doubt, leave it out. However, turmeric also brings some flavour to the dish. Because of that, several authentic recipes call for turmeric leaf.

It is fairly unlikely you’ll be able to buy this at your Asian supermarket. It’s fairly likely, however, that you’ll be able to find fresh turmeric root. It looks a bit like a small ginger root, but with an egg yolk yellow hue.

If you keep it in water for a few hours a day for a few days in a row, you’ll see it start to sprout. Plant it and water it regularly; it likes a lot of sun and doesn’t mind the heat much. Within a few weeks your turmeric leaves should be ready to harvest.

Further spices and flavouring

Salt and pepper. Sure.

Further spices are optional and vary wildly from one recipe to another.

Jintan manis (“sweet cumin” – fennel seeds). Some call for star anise. I would recommend these.

Nutmeg and cinnamon. Opinions on these are divided. Are said to help darkening the dish, so I like adding a bit of both; a pinch of powdered cinnamon and half a grated nutmeg, added at the end of the cooking time.

Cardamom (kapulaga). Not a bad flavour but I associate this spice mostly with Indian cuisine. I tend to leave it out.

Coriander seed (ketumbar). Used in some recipes, not in others. I leave it out, it doesn’t seem right to me. If you must use it, toast about a tablespoon of whole seeds, then grind them up.

Cloves (cenkeh). Works for me, in moderation. Rather than adding whole cloves I add these ground.

Some recipes call for candle nut (kemiri). Perhaps unsurprisingly, I haven’t found this to add much to the flavour of the dish. It might provide some a subtle nuttiness, but it is entirely lost in a dish containing coconut cream, toasted coconut and lots of spices.

Sugar. Perhaps a teaspoon.

Terasi (fermented shrimp paste) – Not commonly found in traditional recipes; this seems to be added mainly in Dutch adaptations of the dish. Can help boost the savouryness (umami) of the dish without affecting the flavour too much but should probably be used sparingly, if at all.

That trademark dark colour

Say no to turmeric root (use turmeric leaf instead), but do add nutmeg and a pinch of cinnamon. Reheat as needed and cook over the course of several days. When drying too much, add a bit of water to allow re-reducing the sauce and darkening it further.

If you have any strong opinions on rendang, corrections or tips that will push my rendang even closer to the Real ThingTM, by all means let me know. I’ll be happy to hear about it!

Tweaks

For a veggie version, try mushrooms. Sprinkle them with salt, leave to stand for a while, then squeeze out the juices. Proceed as for beef. Add a teaspoon of marmite to approximate the beefy flavour more closely. If you forage, look for beef steak mushroom around August. Alternatively use potato, firm fried tofu (might fall apart) or jackfruit. I’ve found jackfruit to have a nice texture but it has trouble absorbing the flavours – try seasoning overnight and let me know how it went.

Cook-off speed tweak – Cut beef smaller than usual, puree a kiwi and mix. Leave standing overnight. Otherwise prepare as normal, but with less moisture and use coconut cream from a block instead of fresh coconut. Start off with cooking the beef from a cold pan. This should allow you to cut down your total active cooking time to under half an hour.

A decent cup of coffee

I like coffee. I really like coffee, when done right.

At its heart, coffee is one of the simplest beverages there is. How hard can it be to mix some beans with water? Pretty hard, it seems – finding a decent cup of coffee in town is hit or miss. We all have our personal preferences in coffee; with sugar or without, take or leave the milk, big or small cups, strong or weak.

I think coffee should be about more than just the caffeine. To me, the ideal coffee should speak for itself. Aromatic and strong, smooth, not overly bitter nor acidic and with a long-lingering, pleasant aftertaste – A coffee so good that it stands on it own and doesn’t need any additives.

And then there’s Britain, where tubs-full of Douwe Egberts instant granules are the norm. I believe this contributes greatly to the popularity of tea.

You can do a better job at mixing beans with water than that.

If the tips below don’t improve your brew at home, then either you’re not using them, or you’re worse coffee geek than I am and I respectfully salute you.

A good cup of coffee is down to two things: Ingredients and preparation.

1. Ingredients
1.1 Water

Water is the canvas that carries the flavour of coffee. Any water is fine as long as it has no off flavours. If you must, use filtered or bottled water; but most likely, as long as the water doesn’t taste chlorinated, it will be fine. Water will lose most of its chlorinated taste if left to stand for a while, if boiled or when passed through a water filter. If not filtered, it might still have a slight earthy taste on its own, as indeed do some coffee beans – you likely won’t be able to tell much of a difference in the final product.

1.2 Coffee beans

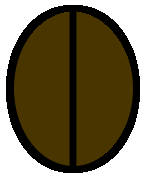
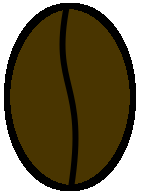
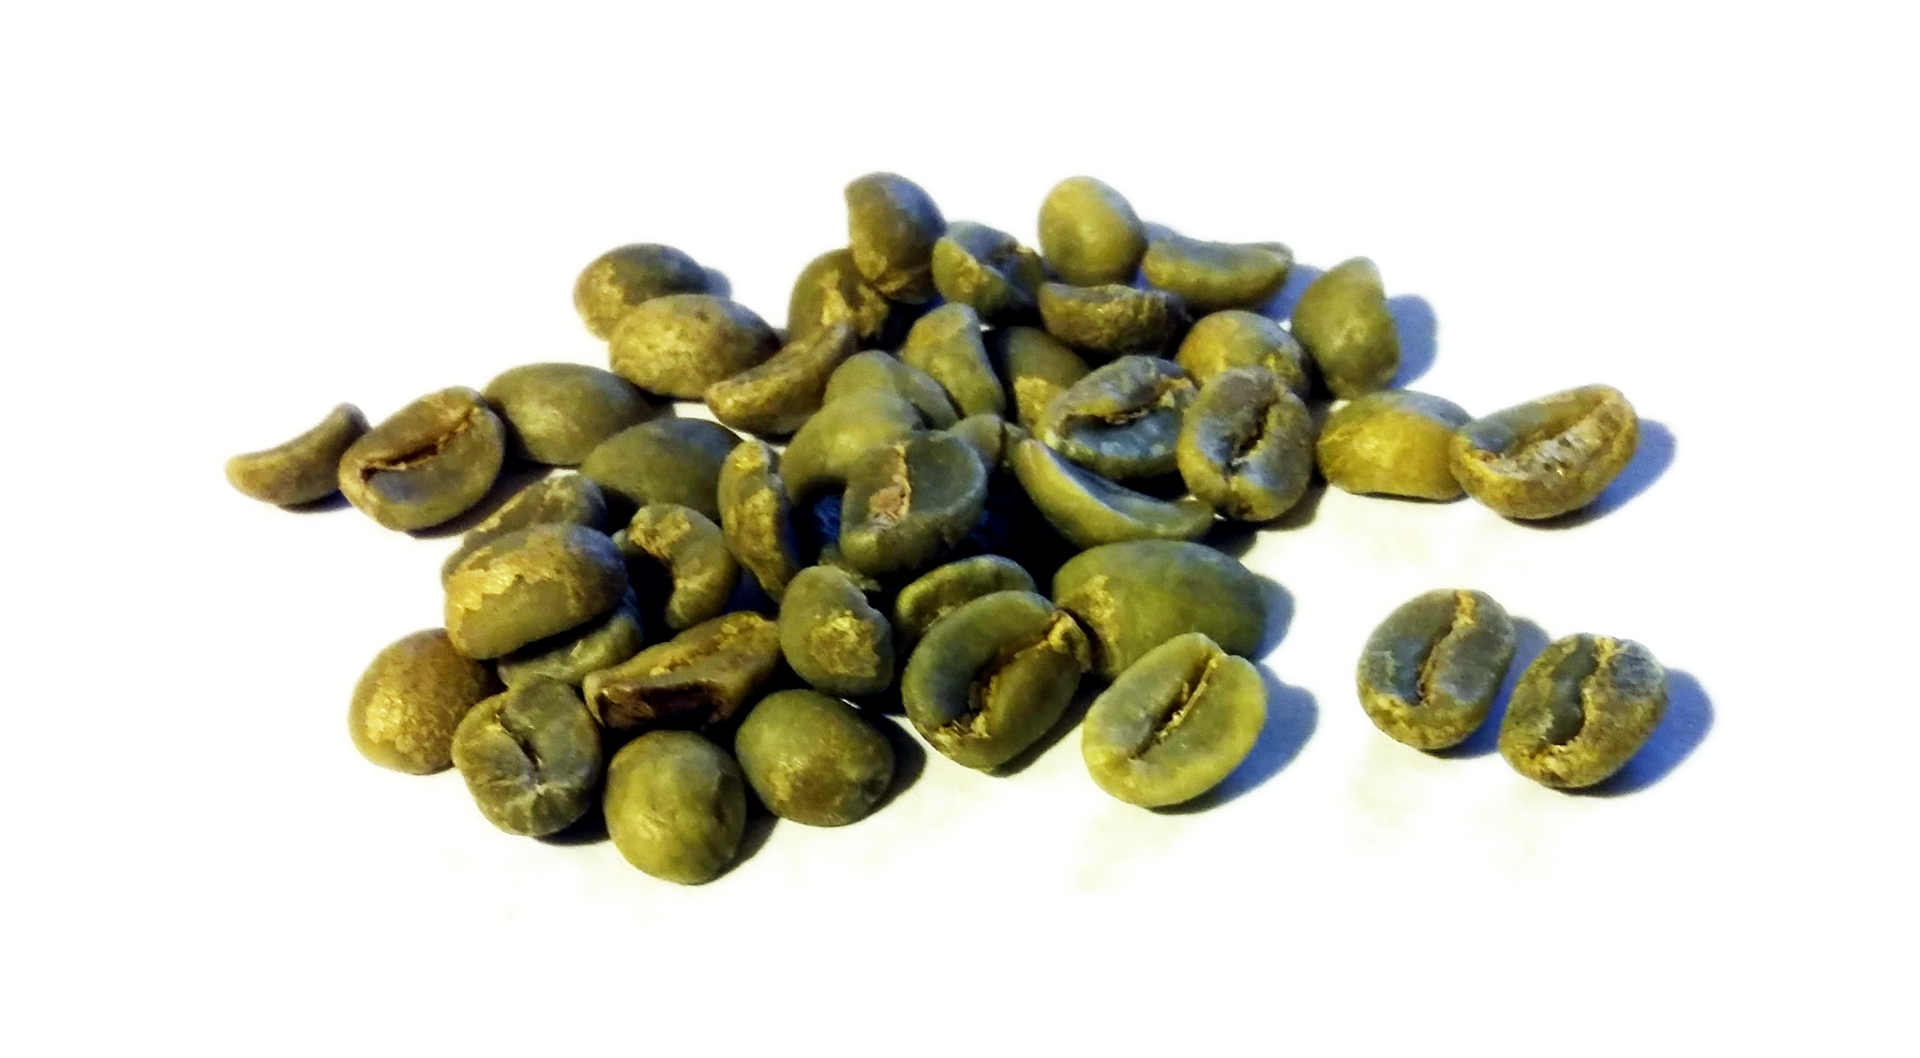
Coffee beans, the seeds of the berry of the coffee plant, are of course the most important ingredient of coffee. They are what provides coffee with most of its flavour, aroma, and of course caffeine. There are several varieties; the most notable being Robusta and Arabica. There is a visual distinction: Arabica beans are more elongated, and the slit in the bean tends to be more wave-shaped; Robusta beans are rounder and the slit is mostly straight (see below). Note that in reality the difference in slit is slightly less pronounced.

robusta arabica
Robusta Arabica

1.2.1. Variety

For best flavour, generally you’d want to avoid Robusta. Robusta has more caffeine and grows quicker, but also has a reputation for tasting like burned rubber. Arabica takes more care to grow, but is more aromatic. From a cost perspective, Robusta is cheaper, but when coffee is pure Arabica,  only, this is considered a selling point; from a food labelling point of view, this means that pure Arabica coffee is typically labelled as such, while often no mention is made of the bean varieties if Robusta beans are present in the blend.

Choose coffee known to be pure Arabica.
If it’s caffeine you want, you can always drink more coffee. It’s more pleasant to drink two cups of nice coffee than to drink one cup of bad coffee.

1.2.1.1. Origin

Yes, coffee has terroir – beans from different places around the planet will have different flavour profiles. African varieties have a tendency to be fruity and bright; Coffees from the Americas tend to be full-bodied and sweet; Asian coffees tend to be earthy and spicy.

1.2.2 Beans vs. ground coffee

Once roasted and ground, coffee will quickly lose its aroma and go stale. Pre-ground coffee will taste best on the day of opening and will already take on stale notes the day after. Go for beans, grind them just before brewing. Maybe you think, “Ugh, aroma, who could possibly want that?” You’re in luck; leaving pre-ground coffee sitting in a doser until a client finally comes along is deemed acceptable by certain red-clad coffee houses, so if aroma isn’t your thing, they’ve got you covered.

I’d say there is one notable exception to using pre-ground coffee. Pre-ground coffee will taste fine every time if it’s the sort that’s individually sealed, be it pods or capsules. It will result in quite a bit of packaging waste, though… and frankly, flavour-wise, we can still do better than that. So I’d say go for beans. Not only will this result in less wasted packaging, but it will also protect you from any sort of vendor lock-in, should that matter to you.

There is another reason to go for coffee beans instead of pre-ground coffee, depending on the sort of country you get your coffee from: Coffee beans are far more difficult to adulterate with non-coffee ingredients than pre-ground coffee.

1.2.3 Storage

Air-tight storage is recommended. Pickling jars are great. Cooled storage or not? It depends. Moisture is the enemy of aroma and as such condensation is bad, but if you’ve bought roasted beans, they’ll keep about a week. There’s no need for refrigeration if your typical batch lasts about a week, but if it takes you much longer to consume a batch of coffee than that, reduce your batch size or freeze part of the batch. Repeated freeze/defrost cycles may adversely impact the quality of the beans, but coffee beans that have been frozen for a month taste considerably better than coffee beans that have merely been stored air tight. Take note: This is especially useful for keeping coffee beans fresh at a friend’s house, if they mostly drink tea or instant coffee. Friends don’t let friends drink bad coffee.

2. Preparation

Regardless of your preferred style of coffee, there are a few things you can do to get the most out of your coffee.

2.1. Cleanliness

The cleanliness of coffee-making equipment is heavily under-appreciated. It’s easy for mould and bacteria to grow on your coffee equipment and taint it with a perpetually stale coffee taste – especially when the coffee maker is not used every day. The high temperature at which coffee is brewed is typically fairly hostile to the moulds that like coffee, so regular use of your coffee maker will prevent these from growing and make coffee taste better. If your coffee maker is tainted with stale taste, replace it or give it a thorough clean – first with bicarbonate of soda, then with citric acid, then rinse it thoroughly.

2.2. Extraction

Extraction is the point at which water is in contact with your coffee grounds. It is the extraction phase that decides which aromas of your roasted beans end up in your coffee. If you have an espresso maker, you may have heard “90 Celcius, 8 grams, 30 ml, 9 bar, 20-25 seconds” as a guideline. This works, but it’s not the entire story. If your coffee maker happens to brew at a pressure of 16 bar and you grind your coffee fine enough for it to take 20-25 seconds to extract, your coffee will be over-extracted and taste bitter as the amount of quinic acid in you brew increases. For 16-bar machines, the sweet spot will be around 15-16 seconds (with slight variations per machine). So in this case,

pressure in bar * extraction time in seconds =~ 240

Of course with a personal sample size of exactly 3 espresso makers it’s probably pretentious to think this would apply to every coffee machine and every method of brewing coffee, though it does happen to match up with the roughly 4 minutes of brewing time recommended for French press coffee. Whatever you do, don’t blindly follow the numbers. Use your taste buds as the ultimate tool discover what pressure and brewing time give you the best result.

2.2.1. Amount of coffee to use

The amount of coffee to use depends largely on taste. A “standard” cup of coffee uses a ratio of roughly 60 grams of ground coffee to 1 liter of water. For my morning double espresso, I use about 16 grams of ground coffee to 30 ml of water. To prevent coffee getting too bitter, generally it’s better to reduce extraction time and increase the amount of ground coffee than the other way around.

2.2.2. Extraction temperature

Extract your coffee too hot, and the desirable aromas will evaporate before you have a chance to enjoy them. Too cold, and they won’t be extracted at all. The 90 Celsius point works well for brewing. Drinking temperature will be considerably lower – 65 Celsius (150F) or lower. Protein denatures at 60-65C (140-150F), so any hotter and you will be destroying your taste buds by denaturing the protein of your mouth.

As cold-brew enthusiasts have discovered, it turns out that extraction at much lower temperature for a longer time works too. Since various compounds have different physical properties, some of the aromas that are had with hot extraction won’t be present in a cold brew. On the other hand, some of the more volatile compounds that find their way into a cold brew will be lost very quickly in a hot brew. Hot brew coffee and cold brew coffee are two entirely different drinks, made out of the same two ingredients. Preparation is everything.

2.2.3. Pressure

Extracting at higher pressure will extract more aromatic compounds. If you like filter-style coffee, try an aeropress; this will give you filter-style brew, but the added pressure will make it more aromatic than a plain filter brew. If you like strong coffee, an espresso maker is the way to go. For the most aromatic, tasteful coffee, I’d recommend against any brewing method that involves boiling the coffee – Sorry mocha pot lovers, that includes your favourite preparation method. If you have an espresso machine, you may use either a pressurized portafilter basket or an unpressurized one. As you get more experienced in making espresso coffee, you’ll develop a preference for the unpressurized basket as it’s easier to clean, but it’s a little bit harder to obtain a nice crema with an unpressurized portafilter – only fresh coffee will result in a nice layer of crema sitting on top of your shot.

2.2.4. Grind

The right grind will help make your coffee taste as good as possible. Too course and your coffee will be weak and acidic; too fine and it will be bitter. Always grind to order. A burr grinder will give you better control over the grind size than a blade grinder, and will generally result in a better coffee. Coffee freshly ground with a blade grinder will still taste vastly better than pre-ground coffee a day after opening. If you grind with a blade grinder, time your grinds – I find 15 seconds works reasonably well for espresso-style coffee. If you choose a burr grinder, get one that is able to grind anywhere from “too course” to “too fine”.

2.5. Extraction time

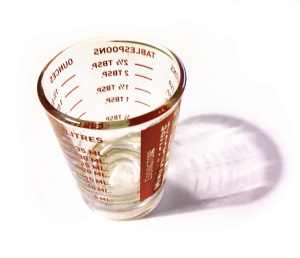
If you don’t extract long enough, your coffee will taste weak and flat. Too long and you’ll start extracting quinic acid, which makes coffee taste bitter. Which means, don’t leave that coffee sitting in that French press once it’s done! In case of espresso brewing, extraction time correlates with extraction volume – I recommend pulling your shot right into a small measuring cup. When I reduced the size of my coffee cups, the taste of my coffee greatly improved because it was harder to over-extract it.

coffee_shotglass

2.6. Crafting the coffee cup

Each preparation method and coffee-making contraption requires different skills to get the best out of your coffee. This is highlighted the most in making espresso based coffee drinks – nobody goes on a week-long course to learn to use a capsule coffee maker to its maximum potential. When we observe a trained barista make a coffee, every move they make has the same purpose: To make the best possible cup of coffee.

Between brew cycles, the coffee maker is wiped and rinsed to ensure no old grounds are left behind as these might add stale and/or overextracted notes to your coffee. Likewise, any old, stale grounds are purged from the grinder, especially at the beginning of the day. For the first coffee of the day, some dry rice or grinder cleaner may be run through the grinder to clean the burrs, after which this is purged with fresh beans. Strictly fresh roasted coffee beans are then ground, on the spot, and to order for the freshest brew.

While the grounds make it into the portafilter, the portafilter is rotated for the most even possible distribution of coffee grounds in the filter. The filter may be shuffled around a bit and tapped to the bench to help the grounds settle. Any grounds heaped on top are spread out evenly, often in a “NSEW” (North South East West) pattern. Excess grounds are removed, leaving a perfectly level un-tamped body of coffee. The grounds are then tamped with a tamper – it is twisted while the finger of the barista moves around the rim of the portafilter to ensure a perfectly level, compressed coffee puck in the portafilter basket. All these movements have as purpose to make the coffee grounds be distributed in the portafilter as evenly as possible. This forces any water to flow evenly through all the coffee, rather than only finding the path of least resistance and creating a “channel” through the grounds. The problem with channeling is that it would cause some of the coffee grounds to be overextracted – resulting in bitterness – while the aromatic oils from the rest of the coffee never make it into the cup.

The coffee shot is then pulled – by far the least interesting step of the process. Care is taken not to leave the water running for too long.

The cup of coffee is given a swirl or stir – this will help the denser, more aromatic coffee at the bottom of the cup blend with the lighter, less aromatic coffee sitting at the top.

2.6.1. Tweaks

One might pre-wet the grounds with a few drops of cold water prior to extraction – I find this results in a more complex cuppa with my espresso machine. Others run their espresso machine for a second and then wait, before the timed extraction.

2.6.2. Blasphemous tweaks

Once in a while I like adding some flavouring ingredients to the portafilter – And yes, I know, right? I blaspheme, but not quite as badly as if I were to flavour my coffee with all manner of syrups.
As it turns out, ground coconut, hazelnuts, cardamom or ginger work well in small amounts and can give a nice touch to the flavour of the coffee, without making it sickeningly sweet. I found cocoa powder would clog up the portafilter, as does ground cinnamon – but one can provide a stick of cinnamon for stirring, stir in some cocoa powder after extraction, or serve a cube of chocolate by the side.

2.7. Roast

Get ready for more rabbit-hole.

So far, I’ve discussed water, beans, preparation method and suggested some brewing tweaks. Hopefully these help you along to make a better cup.

But the single biggest thing you can do to improve your coffee is to get beans that are roasted perfectly to your liking. Darker roasts tend to have more body (up to a point); lighter roasts tend to have more aroma and tend to be more acidic. Achieving the perfect roast is a matter of balancing the two, and perfection to be found on a very fine line indeed.

Roast darker, and you’ll progressively taste less coffee and more roast. Roast far too dark, and the quality of your beans no longer matters because it will lose all subtle aromas and taste burned. Choose a two-tailed mermaid as your company logo and call it a day.

To be fair, the pre-roasted coffee beans from your local supermarket may well be fine. They’re roasted by experts with consistent results in mind. They’re also roasted very much to provide you with an inoffensive, middle-of-the-road coffee, tasting just like coffee but otherwise without much character, tending to err on the side of a darker rather than a lighter roast.

You can do better than that with hardly any extra effort; There are places that sell coffee online and that will roast to order for you. Ordering freshly roast specialty coffee on-line is a low-fuss kind of way to get some pretty darn good beans in.

But you haven’t truly lived coffee unless you have roasted your own.

2.7.1. Green coffee beans

coffee_greenbeans

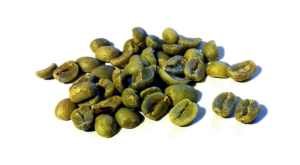
Ordering your green coffee beans on-line is the simplest way. Alternatively, search for coffee places in your town who roast and sell their own beans – they may be willing to sell you unroasted, green beans. On eBay, looking for “green coffee beans” will result in all sorts of nonsensical superfood results – search for “home roasting coffee beans” instead.

2.7.2. Roasting equipment

There are many ways to roast coffee – from simple pan-roasting to dedicated coffee roasting gadgets. Whichever method you use, having some way to control the temperature of your roast will greatly improve the quality of your roast. I found my trusty infra-red thermometer to be an invaluable tool.

If you’re like me, before investing hundreds of pounds/euros/dollars into dedicated roasting equipment, you’ll want to know if home-roasting is for you. So we’re left with cheap options. Here are some methods I tried.

2.7.2.1. Wok-roasting or cast iron pan roasting

Simple and hands-on. Therapeutic. Also, pretty slow going. Be prepared to spend 15-20 minutes continuously stirring your beans. The results aren’t great – the contact heat leaves some dark spots on the beans. Plain and simple – this is not the way to go.

2.7.2.2. Oven roasting

In theory, this sounds good – the maximum temperature of your typical domestic oven makes it, in principle, hot enough to roast coffee beans. But the typical domestic oven also has some trouble getting to its maximum temperature, and at the end of the roast we need just that little bit more power. Still quite slow. Not the result I was looking for.

2.7.2.3. “Dog bowl and paint stripper” method

We’re on to something there. Roasting takes vastly less time this way, and we can exercise a good amount of control over the roast. No more contact heat burns, and the coffee beans puff up nicely this way. But my cheap heat gun didn’t like to be switched on for too long at a time and started making strange noises after a while. It might work for you.

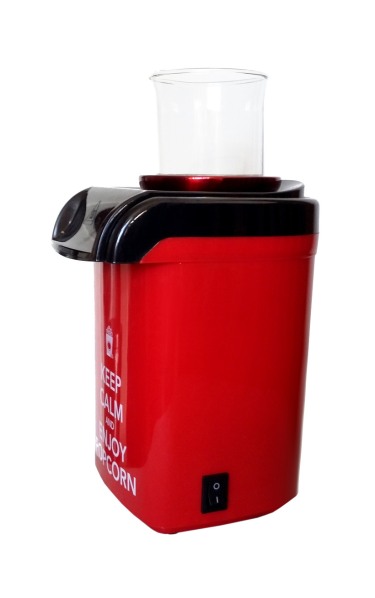
2.7.2.4. Popcorn popper method

We’re entering “Hey, this actually works pretty well” territory. 1200 watts worth of heat does a pretty decent job at roasting coffee. I voided the warranty of my first popcorn popper on the day it arrived and broke it. It turned out there were two heating coils in it, one always on and one only when the fan is blowing. The first coil blew out soon after I stopped the fan. Whoopsie.

I got another hot air popcorn popper of the same model and this time left it unmodified. During roasting, I leave the plastic hood off, as this hood is known not to deal particularly well with prolonged heating – but I found that this allowed the coffee beans to pop just over the edge of the popper. I needed some sort of chimney.

I found my ideal chimney in a French Press style coffee glass. Not only was the glass exactly the right diameter – the metal base would provide me with a way to hold that glass in place.

coffeeglass 
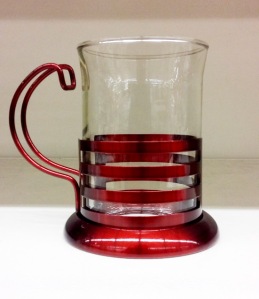
Removing the handle and cutting off the ring stop from the bottom of the base took a while, but was easy enough with a rotary tool. Once I could mount the glass into the base upside-down, I simply dented the middle ring to prevent the glass from falling down further – although I probably needed have worried, since it was a pretty snug fit.  Cutting the bottom off the glass was harder. Designed to withstand a good amount of temperature shock, the usual “score and shock” method for cutting glass proved fruitless. I ended up using a diamond cutting disc in my rotary tool instead, and was lucky enough to manage (it would have cost me a whole pound and a half to get another one).

The resulting chimney looks the part and has served me well ever since.

coffeeroasterInitially the beans may be too dense to be moved by the air flow. As we want an as even possible roast, I tend to use a chopstick to agitate them and help distribute the heat. Once the beans start popping, they’ll be light enough to be stirred by the air flow, and we get a bit of a fluid bed coffee roaster thing going on. Not too shabby. Using this method, it is possible to go from green to roast in about 7 minutes, give or take (which is quite fast – professional roasts supposedly take about twice that). Soon enough I learned that playing with the on/off button during the roast allowed some degree of temperature control, resulting in better roasts. I learned a thing or two about coffee chemistry online – I suggest you follow the link for yet more detail, as that’ll save me repeating the same information. What I didn’t learn was what matter to me most – exactly how to roast my coffee to best match my own personal taste in coffee. By previous experimentation I did however find out that there’s a sweet spot around 150°C – if the roast is kept around that temperature for a while longer, the result is a smoother cup. There’s a phase at which the coffee starts to smoke a lot – at this point it gains body and loses both acidity and identity. I like to balance the roast such that there’s not too much acidity left, but the identity of the coffee is not lost. Unfortunately, it is hard to consistently achieve this balance, even when taking notes. I soon started doing 2 batches at a time; when one batch turned out slightly too light, I could roast the next batch slightly darker and mix the two together. This provides a means to blow away most coffee houses in town.

But there are a few professional roasters in town that refuse to be bested by an amateur home roaster who merely roasts by trial and error. I needed structural, progressive improvement.

It wasn’t practical to merely keep notes on what I did when a roast turned out particularly well. There were simply too many on/off cycles to get a roast to be exactly the same every time. I needed more control. I started thinking about how I’d make my roasts more measurable and reproducible. I realized that an easy way to record the roast was by recording an audio file of the roasting process.

coffeewave_guatemala
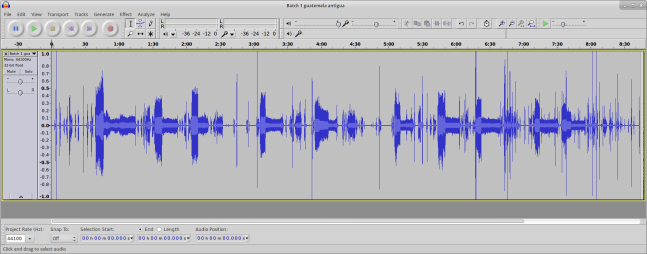
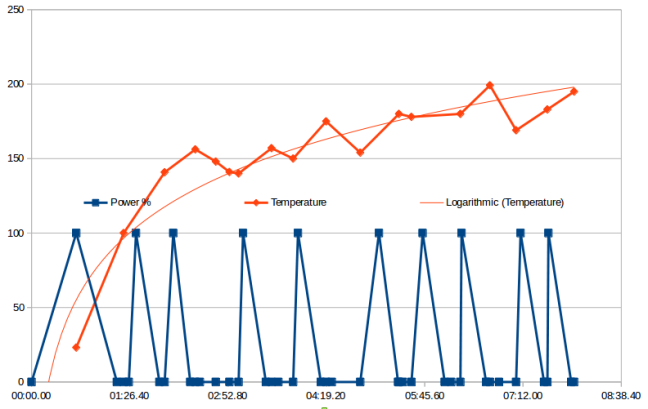
This clearly showed me at exactly which point I switched on and off the popcorn popper. While roasting the coffee, I’d also take temperature measurements with my infrared thermometer and speak them out. The resulting audio file ultimately allowed me to feed the data points into a spreadsheet and plot temperature over time, with a minimum of hassle to collect the actual data.

coffee_graph
More importantly, it provided me with a way to reproduce the roast. I could do this by simply playing back the audio file and mimicking what I heard. Instead, I decided I wanted to automate my roasts. I could store the on/off times in a file and turn the popcorn popper on and of by computer. This turned out to be surprisingly simple with a USB-driven relay. As a 1200 Watt popcorn popper at 240 volt clocks in at 5 ampere, I figured a circuit board with 2 10-amp relays would do nicely.
coffee_usbrelay
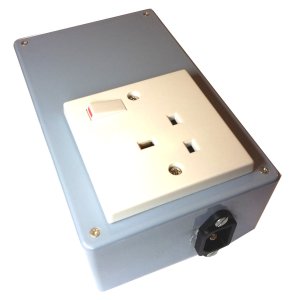
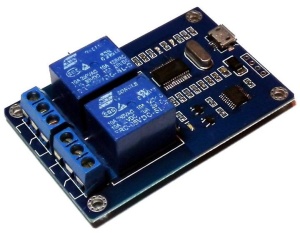
I chose a board with 2 relays in case at any point in the future I wanted to add a cooling fan. I proceeded to build it into a project box – only basic electrics skills required. At this point, what I had was a box that permitted me to switch on and off mains power to basically any electric device – in this case a popcorn popper. A rather elegant solution; note that essentially this popper is still unmodified. Add a small script (I’ll gladly provide you with it) and the computer can control switching on and off the popcorn popper – or any other device for that matter.

Update: The micro USB connector came off this circuit board, so I ordered in a circuit board with a sturdier connector. As I’m writing this, it hasn’t arrived yet. In the meantime I’ve updated my roasting script so it can support multiple device types.

As I had nearly run out of roasted coffee, I saw the merits to also allowing the script run without automated switch box. When doing so, the script simply prints “ON” and “OFF” to screen, allowing one to perform a computer-aided roast by switching the popcorn popper on and off as indicated by the script.

Update 2: The new USB controller board has arrived. I have added drivers to the roasting software to auto-detect which board is present.

this still doesn’t provide us with real temperature control, in practice this isn’t much of a hurdle. One; when starting with similar starting conditions and performing exactly the same operations at exactly the same time, the result should be pretty similar. By tasting a roast, I can now make progressive adjustments to the roasting procedure until it tastes just right – so far this has resulted in the best cup of Guatemala coffee I’ve ever brewed. I can take two different roasting profiles and compare them side-by-side to determine which of the two is the best.

And if this solution no longer serves me, I can always add proper temperature control.

coffee_roastingcontroller

Currently I use my PC to control power, but there’s no reason why it would have to stay that way. The used controller board provides serial pins and could be controlled by Arduino, or a credit-card sized single-board computer such as the Raspberry Pi could be used to control the power (In the latter case I wouldn’t even need to write a new script). It could still easily be added inside the project box, creating a dedicated coffee roasting box.

Once your roast has completed, you may notice a few beans that are considerably lighter in colour than the others. These are called floaters and they’re beans that have a very low amount of aromatic compounds in them. If you munch down on these beans, you’ll find they taste a bit like popcorn and not at all like coffee. Discard these beans, they add nothing to your cup.

2.7.3. Tasting

Finally, the most important thing about your cup of coffee – tasting it, or as it is called in official terms, cupping. There are standards on how a coffee should be prepared for tasting, but for personal use I suggest to prepare the coffee as you would normally drink it; It seems pointless to me to brew a filter-style cup of coffee if all I ever drink is espresso, as it doesn’t give me a meaningful frame of reference. I would however suggest to brew your coffee in a way that you can reproduce perfectly identical, time after time. It makes sense to let the coffee beans develop their taste for a few days. It allows the oils in the coffee bean some time to absorb the flavour. Also, at the very early stages after a roast, the coffee beans still emit carbon dioxide which would dissolve in water and form carbonic acid, which alters the flavour of the coffee.

If you ever wondered why coffee hardly ever comes in vacuum packed bricks anymore, carbon dioxide is the reason; coffee can only be properly vacuum packed once it no longer emits gas, which means letting it breathe for a few days. This takes both storage space and time, and ultimately doesn’t benefit the coffee. Also, of course, the valve in modern coffee packs permit you to smell your pre-roast coffee before buying it. It’s simply good marketing.

Incidentally, it is also carbon dioxide which is responsible for the crema on top of your shot of espresso, and hence a good crema is an indicator of the freshness of your coffee – unless, of course, the crema isn’t really crema but foam whipped up in a foaming chamber.

Hello, companies who add foaming chambers to coffee makers: Foaming chambers don’t magically make the coffee fresher. Stop lying to us.

2.7.4. Enjoy your coffee!

I like coffee. Especially if it’s good coffee. And now that I have the tools to make a cup that’s perfectly tailored to my personal taste, I’ve got that covered.
Once you’ve gone through these steps, it’s likely you can now enjoy a pretty decent cup of coffee – and isn’t enjoying your coffee the most important step of all?

May you drink many good cups of coffee. I hope you’ll enjoy your coffee as much as I enjoy mine.

Prawn crackers / Prawnless crackers

Prawn crackers are a crispy, light, deep-fried delight, and it’s not strange that most supermarkets stock them nowadays. But you might have several reasons to avoid buying them.

Perhaps they contain gluten. Perhaps you’re vegetarian. Perhaps you want to avoid MSG. You may have a favourite brand of uncooked prawn crackers. Or perhaps you’re trying to diet, in which case I can’t help you.

I said, uncooked prawn crackers. Not everyone is familiar with uncooked prawn crackers – they come in all sorts of shapes and sizes, but they may look a bit like translucent bits of plastic.

crackers_uncooked
Bone dry, they keep virtually forever. When fried in hot oil, for seconds, they will expand and turn into the bubbly, crispy crackers that we all know and love. Many a YouTube chef will proudly show you how to fry these ready-made uncooked crackers.

In this post, however, I’ll be showing you two different methods to make these uncooked crackers yourself. The first method is the traditional way to make prawn crackers. I’ve developed the second method to overcome some of the limitations of the traditional method.

Method 1: Traditional

For our traditional prawn crackers, we’ll start from a traditional prawn cracker recipe. It’s written in Indonesian, which is pretty much a guarantee that the recipe is authentic, as they’d prepare it themselves.

What the the traditional recipe comes down to is fairly simple:

  • It requires equal amounts, by weight, of tapioca starch and prawns. We’ll scale down from the amounts used in the recipe above.
  • These are mixed with “as much as needed” amounts of salt, garlic, sugar, MSG and water to season and to get the right consistency.
  • The ingredients are then processed into a smooth dough, which is wrapped in banana leaf and thoroughly steamed.
  • The steamed dough rolls are chilled, sliced and dried in the sun, after which they can be stored.
  • To finish them off, they’re fried in hot oil.

The amounts in the recipe are not very precise, but this need not be a problem. Sure, there are no definitive amounts of salt, garlic, sugar, MSG and water mentioned, but it stands to reason that we want a well-seasoned dough sausage. Most recipes work well with between 1-2% salt, and we don’t want to go overly sweet – 3-5% of sugar should be plenty. MSG is optional, and a clove of garlic should be plenty (though we can use more if we want to make garlic crackers, which are yummy, too). The amount of water should be such that the dough holds together, but not so much that it gets sticky and hard to handle. So overall, we can use guesstimates and our recipe should turn out just fine.

Perhaps we want to add a bit of black pepper. Or some hot chilli powder. Perhaps we want to leave out the sugar. These are our crackers. So season as you like. I’ve found it’s easier to process the prawns before mixing them with the tapioca flour by the way – the dough gets smoother that way.

crackers_ingredients
Once the dough has a smooth consistency, shape into sausage-like rolls, slightly thicker than an adult thumb.
crackers_sausages
Roll them into foil, ensuring no moisture can get in. Steam them thoroughly until the dough is fully cooked until the centre – At least 1 hour, possibly up to 3. Once steamed, rinse the sausages, still in the foil, under cold water – This will help the sausages to cool down a lot more quickly than if we just waited for them to cool.  Unwrap the sausages – The dough should have turned glue-like and be translucent all the way to the centre.

crackers_sausages_steamed
Now we’ll cut them into as thin as possible slices. To do so, we take a hint from sushi chefs: before every slice, we’ll dip the tip of our sharp knife in a bowl of water, then tap the back of the knife handle to our working surface so the drop of water runs down the entire cutting edge of our knife. Cutting with a wet knife like this helps prevent the sticky glue from sticking to our knife. Arrange the slices on a flat surface…

crackers_sausages_sliced … and leave them to dry in the sun.

crackers_dryinthesun
Plot twist: It’s raining and there is no sun. Also, it’s night. And you don’t have a dehydrator.

You could wait until mid-summer, but that’s hardly practical at this point. Or you could dry the crackers for 12 hours in the oven at 70ºC/160ºF (with the oven door slightly open).

The method I prefer is to just put the crackers in front of a running fan. It takes roughly the same amount of time as oven-drying them.

crackers_dry
Once the raw crackers are completely dry and hardened, they’re ready to store or fry. You’ll have to fry them in very hot oil, 190°C / 375°F. If you don’t have a thermometer, you can test the proverbial waters by dropping a small piece of cracker into the oil. If it expands and comes floating to the surface in a few seconds, the oil is hot enough.

crackers_fried
I could pretend these were the best crackers I ever had. But they weren’t. Although they turned out tasty enough, but they sometimes had a chewy centre. I’ve encountered this before when frying crackers before they were fully dried – so I concluded this was most likely caused by residual moisture. So I dried them for longer, and weighed them in the process to make sure they had finished drying. crackers_chartWhen my scales indicated that the 25 gram batch of crackers lost less than 1/100 of a gram of water over a 24 hours period, I decided the weight of the crackers was pretty much flat-lining, so it was time to stop drying them. While they still lost some moisture compared to when I originally thought the crackers were dry, it was under half a gram for a 25 grams starting weight; Less than 2% of total weight after initial drying. Hardly significant.

As could be expected, when I fried up the fully dried batch of crackers, they were as chewy as before. What went wrong?

Despite their dry appearance, prawn crackers contain lots of tiny pockets of trapped moisture. With nowhere to go, when the crackers are fried, this trapped moisture turns into steam and forces the crackers to expand. Since the physics of prawn crackers depends on pockets of inescapably trapped moisture, this also means that no amount of extra drying time would have released the last bit of residual moisture.

In turn, this means that the residual moisture content of our crackers after drying depends on the moisture content of the crackers before drying. Less moisture after drying also means there is less moisture to turns to steam during frying, and thus results in smaller bubbles and denser, crispier crackers.

Had I been able to slice thinner slices, some more moisture might have been able to escape through additional exposed surface area. But I sliced as thin as I could. But still, there are a few things that can be done to improve on our reference recipe:

  • Use less prawn, which was the only source of moisture in the above recipe – but also the main flavour component. Based on previous experiments, I’d suggest reducing the amount by about a quarter. Note that I used individually quick-frozen (IQF) prawns, which may have had a higher moisture content than fresh prawns. It may be worth it to pat dry your prawns before adding them to the dough.
  • Prior to drying the slices, we could refrigerate the “sausages” for a day or two, or putting them into the freezer until slightly firmed. This will allow us to cut thinner slices – which would then result in increased cracker surface area and therefore less moisture trapped in the end result. Of course, it would also delay the end result.

Method 2: High tech, gluten-free veggie crackers

I’ve developed my own method for making crackers because someone didn’t like prawns. This was perfectly fine while we could easily buy veggie crackers, garlic crackers and bitternut crackers, but after moving abroad, that was no longer an option.

So I revisited the recipe, and the very first thing I noticed was that without the prawns and without gluten, tapioca flour doesn’t hold together as a dough. It just turns into a non-Newtonian sludge, much like corn starch. Just as well; I’d just make a batter instead of a dough, and steam it on the indentation of a saucer, using up about a teaspoon of batter and making one cracker at a time. Each cracker would take between 4 and 5 minutes to steam into a slice of glue – any shorter and it would have dull spots, which would not fry up properly. I nearly burned my fingers every time I took a saucer out of the steamer. The slices of glue peeled off easily under the running water I used to cool them down. At least I knew there was a way.

On my first attempt, I used 2 parts of vegetable stock to 1 part of tapioca flour (by weight). This resulted in quite thick crackers, with large bubbles, reminding of pork rind in structure – sometimes a bit chewy in the center. In fact, the texture was quite similar to the above prawn crackers. Because of this, I expect reducing the prawns in the reference recipe above by a quarter to a third would greatly improve the texture.

For my second attempt, I used equal amounts of stock and flour by weight, resulting in a texture not unlike Thai-style crackers – with very small bubbles, quite thin and crispy. These were rather nice and delicate, but this wasn’t texture I was looking for at the time.

I went for a happy medium and found the texture I wanted at around 100 grams of tapioca flour to 150 grams of liquid.

After finding out I could dry the crackers in front of a fan, the next breakthrough was when I found out the microwave worked a treat to cook the crackers. The resulting crackers did seem slightly denser than steamed ones though – so I slightly increased the moisture for the microwave version.
20-30 seconds on high, cooking 3 crackers at a time, was a lot faster than I could steam them. I no longer had hot steam burning my fingers, they were just as good, and I could “steam” 3 crackers at a time, allowing me to make about a hundred of them in an hour. Perhaps this newfangled technology has its place in the kitchen after all!

As for the flavour, I always enjoyed the kick of Thai-style crackers, the nutty taste of sesame of the vegetable crackers and of course lots of umami.

So here’s the method I came up with. As always, you can adapt it to suit your tastes and needs

  1. Using 100 grams of tapioca flour, 160 grams of water, make a batter and blend in flavourings to taste – For instance, a deseeded chili, a clove of garlic, a tablespoon of sesame seeds, a teaspoon of sugar, salt & pepper to taste and 1 lime leaf.

krupuk2_batter

2. Stir the batter to evenly distribute the ingredients, then put a spoonful of batter on the indentation of a clean, dry saucer.
krupuk2_saucer3. Microwave for about 20 seconds on full to cook the batter (you may be able to cook several at a time). Under running water, peel off the slice of glue. It should be transparent without dull spots. Move the slice of glue to a drying surface – Ideally something reasonably flat and flexible to help you peel off the crackers once dried. I use a plate covered with cling film.

krupuk2_drying4. Dry your saucer and repeat the procedure until you’ve used up all your batter (approx. 40 crackers). Leave to air dry. Pointing a fan at the crackers will speed up the drying but air drying does work as well. Congratulations! Your crackers can now be stored, ready to fry.
krupuk2_dried
5. Fry your crackers at approx. 190°C (375°F) in oil with a high smoke point – Sunflower oil or groundnut oil. Pictured below: Raw cracker (left) vs. fried cracker (right)
krupuk2_fried6. Delicate and light, your prawn-free crackers are now ready to munch. Enjoy!

Tips and suggestions:

  • Try using candle plates for extra big crackers (make sure your microwave is perfectly horizontal).
  • Try adding a little bit of baking powder for extra light crackers

Have you made these crackers? Questions/suggestions? What’s your favourite flavouring combination? Leave your comments below!

** If you need proof or want to do some real food science, make two batches of crackers made with the same amount of tapioca flour but different amounts of water. Steam and slice, then and graph the weight of both batches over time until their weight flattens out. As both batches contain the same amount of dry matter, if moisture is not trapped, then both batches will end up with roughly the same amount of moisture and they’ll end up weighing the same. If moisture does get “inescapably trapped” and “no further amount of drying will dry them out further”, then the batch of crackers with the higher percentage of starting moisture should end up weighing more than the dryer batch, despite having started from the same amount of dry matter.

Candy floss

I’m going to assume that at some point during your life, you’ve had the opportunity to try candy floss, cotton candy, fairy floss, or whatever you happen to call it in your local dialect. “Sugar spider”? Sugar spun into strands so thin, that it turns soft and fluffy, and it dissolves into nothing the moment you put it on your tongue.

I’m also going to assume that you didn’t make that candy floss at home. Because although your mum or dad wanted you to have a good time, they never bought you a candy floss machine, because they’re too expensive, life’s not fair, and besides, sugar is bad for you, so you had to eat it at the fair.

Fast forward to the 21st century. Candy floss is now sold in buckets made of more plastic, by weight, than the candy they contain. Boo.

On the other hand, candy floss making machines are now reasonably affordable consumer items, but if you’re like me, you figured that you’re probably going to use it once or twice, and it will only be gathering dust from then on – making the candy floss so expensive per serving that you’re better off buying it ready-made. So you end up not buying a candy floss maker, and if you have kids, you tell them life’s not fair, and besides, sugar is bad for you, so you should eat candy floss at the fair.

Or should you?

A kilo of sugar, costing 60p here in the UK, makes just over 30 servings. The owner of the candy floss stand at the fair isn’t afraid of a tidy mark-up!

Also, a serving of candy floss contains about 30 grams of sugar, about as much as a serving of the leading soft drink – hovering at the maximum recommended daily dose of around 25 grams for an adult**. Thanks for raining on my parade, WHO.

I might as well stop writing this blog post right now. Just when I’ve come this far writing it, and you’ve come this far reading it. But we don’t have to actually eat any of the candy floss we make. We can just look at it. Maybe only smell it. Maybe just have a small nibble, no more. Sure we can.

Various approaches to making thinly-spun sugar

At its most basic, candy floss is nothing more than sugar that’s heated until the sugar crystals soften and flow together; and is then subsequently stretched into thin strands while it cools to the point where the sugar goes solid again.

There are various ways to achieve this.

An old Chinese recipe is Dragon’s Beard candy; soft sugar is shaped into a ring which is repeatedly stretched, folded and dusted with starch to prevent the strands from fusing back together. The method is somewhat similar to making hand-pulled noodles.

Then there’s a method which involves covering your entire kitchen in newspapers and using a fork to flick hot sugar over a pair of wooden spoon handles. This method produces strands quite quickly. It doesn’t require any starch, but it is quite sensitive to getting the temperature just right, makes for relatively course spun sugar, and quite a bit of the sugar serves no other purpose than to make your newspapers and your kitchen sticky in no time flat. There’s something interesting about this method though, as the sugar is not stretched by hand, but by acceleration and inertia.

The modern candy floss maker was invented in the late 19th century by Nashville candy maker John C. Wharton and dentist William J. Morrison, the latter of whom clearly had no conflict of interests. The following diagram shows roughly how it works:

candyfloss_diagram

Sugar is placed in a perforated, spinning drum. The sugar is course enough and the holes in the drum are fine enough that the sugar stays in the drum while it is solid. The drum is heated, causing the sugar to melt, which allows it to be flung out of the drum through the holes, forming strands of molten sugar. Having left the drum, the sugar is no longer heated and quickly sets back into solid form. Since there are lots of holes in the drum, many strands will form. The collection bowl prevents the sugar from flying all over the place and getting everything sticky.

What makes this tricky is that the sugar has to be course enough and the holes have to be fine enough – and while we’re at it, the candy floss seller at the fair offers various colours and flavours. Though we can certainly build our own candy floss maker, it will just as well end up collecting dust, not to mention that we will very soon get to the point where buying one is cheaper.

So we’ll simplify. We’ll make do with what we have. For the spinning drum, we’ll start by getting a tin of about the right size. From there on, we’ll get to the business of making candy floss, MacGyver style.
candyfloss_maciver Yes, I know you can read. Don’t be pedantic. It’s close enough.

At this point, we’re mostly interested in the tin, but we’d miss an opportunity if we didn’t also use the contents later on. Such pretty pictures of healthy fruit and veg printed on the tin. And the compound word “Multi-vitamin”. The WHO will be pleased.

So let’s reserve that candy. Find another container for it, preferably air-tight – we don’t want humid air to get to it because the candy will get all sticky, since sugar attracts moisture. Anything ranging from a humble plastic bag with a knot in it to a posh glass jar with the word “sweets” embossed on it will do.

We’ll need to make a small hole in the base of the tin, as precisely in the centre as we can. To get to the centre, trace the outline of the tin on a piece of paper.

candyfloss_trace
Cut out the circle as precisely as you can and fold the circle exactly in half twice. The centre of the circle is where the folds meet. With the tin turned upside-down, place the circle back on the base of the tin.

candyfloss_centredcircle

Flatten your circle, align it carefully and mark the centre of the base through the paper with a sharp pointed object.

Now break out your rotary tool. Isn’t cooking fun?

Take the necessary health-and-safety precautions – be sensible. As drill slippage is expected, using a high-power electric drill for this project is most certainly not sensible. If you don’t have a rotary tool, you’ll likely be able to buy a cheap one. They’re around ten pounds on eBay. Rotary tools typically come with small cutting discs and sanding discs and one or more drill attachments including the mandrels that allow you to mount those cutting discs onto the tool.

candyfloss_attachmentThe hole of one of your cutting discs probably gives you a good idea about the size of the hole you’ll need to drill; you may be able to drill your hole slightly smaller. Do you see where this is going? We can now attach our tin to the rotary tool and take it for a spin.

candyfloss_testdriveIf your tin is wildly off-balance, you may have to try again. Keep in mind that for various reasons, your tin is unlikely to ever be 100% perfectly balanced. If you’ve closely followed the instructions above, it’s probably fine. To finish off our contraption, all we need to do is to drill lots of little holes…

candyfloss_sanding
… and sand down the inside of the tin to flatten out any bumps created by drilling outside-in. These bumps would prevent our liquid sugar from flowing out, so we’re getting rid of them.

So now we’ve got a candy floss making contraption. If you don’t feel like drilling hundreds of holes, you could also try the alternative, mesh-based version (the mesh is cut from a 1-pound sieve):
candyfloss_contraptionv2
After cutting a start, I could cut most of the gaps with scissors, so this version is probably a bit quicker to make – but it’s also more likely to leave your contraption having sharp edges, strips of metal and sharp mesh wire. You really don’t want to get sharp bits of metal stuck in your insides (or anyone else’s for that matter), so you’ll have to make sure to sand down the edges and you should probably double-check there’s no bits of metal left inside. The point is, be safe.

As you can see, we’re hanging our spinning drum from our rotary tool. Now all we need to do is to heat our sugar. If you’ve tried using a candle, you’ll have noticed that the air displacement from spinning our tool will blow it out. But we don’t need to heat our candy or sugar in our contraption. We just need to warm it. So instead of modifying our contraption to provide the heat, we’ll melt the sugar on the hob (what a concept!) and that allows us to keep our contraption pretty minimalist.

So get your happy little candies on the hob, on low heat. Playing candy crush in advance is entirely optional; I choose not to.

candyfloss_boilingWe could use regular sugar, by the way – but it has a slightly higher melting point than candy, around 160°C (320°F) as opposed to about 150°C (300°F) ***. This is due to the glucose syrup usually present in hard candy. As a result of the higher melting point, plain sugar may take on a slight caramel taste. But we’ve got candy available anyway – we might as well use it. Once it’s just molten turn off the heat and leave to cool for a few seconds – we want to stay as close to the hardening temperature as possible, otherwise our candy floss won’t harden.

Hold your candy floss contraption in one hand, lowered in a bucket or similar. Hold your saucepan of liquid candy in the other hand. If you’re shooting video, hold your camera in your other, other hand.

As for your paper cone… they’re probably not much use with this contraption as it’s so hands-on. But should you choose to do so, you can make paper cones really easily by rolling up a regular sheet of printer paper as tightly as possible, starting at a corner and holding the opposite corner under the tap once you’re two thirds in, then rolling them up further and letting them dry.

I didn’t have my third hand available, so forgive me for posting a bit older video I made:

Compared to the drilled contraption used in the video, it seems the mesh-based version seems to result in slightly courser candy floss, though while experimenting I noticed that a less course candy floss can be obtained by mixing in plain sugar.

candyfloss_v2result
But still – Behold. Home made… Multi-vitamin candy floss, so healthy it will make your teeth chip!

As for clean-up, the easiest way is to just dunk your whole contraption in a container of water until the remaining sugar has dissolved. Don’t try that with a store-bought candy floss maker. And at the size, storage is no issue; you might even store paperclips and rubber bands in it, though drinking straws won’t fit.

The little contraption described above allows you to do all kinds of candy floss experiments. The obvious thing to do is to try all sorts of exciting flavours such as orange, cherry, mint, caramel, coffee or nam pla. The sky is the limit.

You can compress and shape it into a melt-in-the-mouth, felt-like texture – maybe as part of a dessert.  Remember that sugar is hydrophyle, it attracts water – so candy floss doesn’t keep for long.

Far less obvious is to try to make sugar-free candy floss or lower-sugar candy-floss, though I’ve personally not had a lot of success with this; I found pure Xylitol as well as sugar-free mints did seem to pull threads, but they didn’t crystallize back from a thick syrup into hard floss strands, but you may have more luck with other sugar substitutes, different hole sizes, a mix of sugar and non-sugar or indeed a different contraption altogether.  It might be possible to make candy floss that’s actually good for your teeth. It will likely also clean out your system. And perhaps, in the end, we’ll keep the WHO happy too!

A final note: Instead of using a candy tin, I also tried making candy floss using a perforated paper cup. It was easier to do than making a contraption out of tin, but it wobbled a lot and hot sugar splattered all over the kitchen, possibly due to the sloping edges of the cup, so I wouldn’t recommend it.

Have you made candy floss? Please share your experiences below!

** Ideally. See page 4.WHO recommends reducing the intake of free sugars to less than 10% of total energy intake (strong recommendation); WHO suggests a further reduction of the intake of free sugars to below 5% of total energy intake (conditional recommendation) which amounts to about 25 grams. So occasionally going over 25 grams isn’t all that much of a drama. Woo hoo!
*** I keep saying that sugar melts. That’s not entirely accurate. Sugar doesn’t melt; it decomposes.

Quintuple-Cooked Chips: Pretty Good Fries

Get your geek on and start up your kitchen gadgets – We’re going to try to cook one of Heston Blumenthal’s classics, tweaked for the home cook. Which one – Snail porridge? Bacon-and-egg ice cream? No! We’ll be doing our utter best to give Heston’s Triple Cooked Chips a run for their money.

In under an hour, and without specialist gadgets, we’ll be turning this:
marispiper_raw
into these:
5xc_chips

And I’ve got absolutely everything I need to make it happen.

I’ve got a reason.
I’ve got a back story.
I’ve got a recipe.

And I’ve got silly glasses.

I am ready.

The reason: The elusive Great British chip (as in “fried potato strips” – not “wafer-thin fried crispy potato slices”).
Crispy on the outside. Fluffy on the inside. Did I say elusive?

I apologise for interrupting this post for an important message to 9 out of 10 chippies in Britain.

Hello, you can do considerably better.

End of announcement. Sorry, it had to be said.

The back story: I went to a wannabe-gourmet burger joint in the past week. The expression “Cheap as chips” was clearly lost on the owners of this joint, as a single portion of them cost £3.35, as much as five kilos (over ten pounds!) of Maris Piper potatoes. I also ordered a burger, which I shall ignore for the remainder of this post.

Potatoes don’t tend to turn into chips all by themselves, so I figured I’d give this establishment a fairer price comparison with other establishments. That’s where Heston Blumenthal’s original Triple Cooked Chips enter the story. Served at the three-starred Michelin chef’s pub The Crown at Bray for £3 per portion. I’ve had these chips at The Crown in the past, and they were excellent. Crispy on the outside, fluffy on the inside – the way chips should be.

One would expect that chips priced at an even higher price point than this gold standard ought to be, at the very least, pretty good. So while I was waiting for the food to arrive, I was daydreaming about the most glorious chips ever.

The daydream ended abruptly when the chips arrived. They lacked any crisp, were stodgy and unseasoned. I sent them back for a bit longer fry, but even that didn’t remedy the situation, and I ended up leaving into the miserable gray. Alone, without umbrella, disappointed, my pocket a good deal lighter, feeling sorry for myself and still craving nice chips. Good thing it wasn’t raining.

I decided to make some proper chips myself, so I got myself a bag of Maris Piper potatoes and looked up the original Triple Cooked Chips recipe from Heston Blumenthal’s Fat Duck Cookbook. It’s a fairly simple recipe (to Heston’s standards, anyway). In short, if you’re feeling peckish and want some chips now, here’s what you’ll have to do:

Start cooking yesterday. Peel Maris Piper or Arran Victory potatoes, cut them into 1.5cm square strips. Rinse them for a few minutes to wash off some starch. Boil them in salted water until almost falling apart, use a vacuum chamber at full power to dehydrate them (thrice!), chill them in the fridge, fry in oil at 130°C, vacuum chamber thrice again, freeze them, and finally deep fry again at 180°C. **

Almost nobody has the requisite gadgets in their kitchen to make this happen (a vacuum chamber and a time machine). I thought it might be useful to build a cheap vacuum chamber, so I looked up vacuum pumps on eBay, and got scarred for life because people are freaks. So I’ve come up with an alternative recipe which can achieved by a normal home cook in a normal kitchen. It’s got all the appeal of the real thing, but takes a lot less time. I’ve made some tweaks to make the recipe my own, making me even slightly prefer my version over the original; but it’s possible that I’m biased, or simply delusional.

Understanding the original Triple Cooked Chips recipe

If we take a closer look at the above method, we see some steps that are intended to accomplish a particular goal, and some steps that describe how to optimize the recipe to get the best possible result.

  • The potatoes are chosen for their moisture content (just shy of 22% dry matter) and flavour. The humble home cook has no means to check dry matter content of potatoes in store, but Maris Piper is an obvious choice as it’s an easy to find, flavoursome all-rounder here.
  • Peeling them appears to be the norm.
  • The size of the strips is an  about getting the optimal balance between exterior crisp and interior fluffiness. Too thin and your chips will all crisp and no fluff; too thick and they’ll never crisp up. Chippies, take note.
  • Washing off the starch makes the chips easier to handle and is supposed to make them more crispy. More on this later.
  • Boiling helps the potatoes fluff up and create crevices all over their surface, which will help oil to soak in when frying.
  • All the oil in the world won’t crisp up a wet chip – moisture is the enemy of crisp, so a vacuum chamber is used to drive off moisture. High school physics says that lower pressure causes water to boil off at lower temperatures.
  • We then fry at 130°C. This is traditional for twice-cooked chips; it will drive off more moisture by turning it to steam. This creates cavities in the surface of the chip as steam escapes. As the potato is already softened, the effect is more dramatic than if we had started with raw potato. The temperature is chosen above the boiling temperature of water, but below the temperature at which browning generally takes place.
  • We drive off yet more moisture by another trip to the vacuum chamber.
  • Finally, we brown the chips to the desired degree, sprinkle them with salt and serve them immediately.

For our home recipe, we’ll follow roughly the same procedure, but with a few tweaks.

1. I cut my chips slightly thinner
I like my chips fairly crispy, so I cut them roughly 12mm thick. It’s a bit of a balancing game, and this thickness seems to work well for my recipe. For what it’s worth, the Triple Cooked Chips at The Crown in Bray were also cut slightly thinner than indicated in the Fat Duck cookbook.

2. I don’t rinse the starch off my potatoes when making chips.
I don’t doubt that washing off the starch for several minutes will make the chips easier to handle. In a commercial environment it would be desirable for potato strips not to stick to each other, but in a home kitchen this might not matter all that much. Another reason for rinsing off starch is given; it is supposed to make the chips crispier. This seems counter-intuitive to me. After all, prawn crackers are made of nearly pure starch and are amongst the crispiest things out there. So I tried a little side-by-side experiment, and found that the unrinsed chips were indeed slightly crispier (confirmation bias applies, but feel free to try this out for yourself). I’ve also tried a batch where I lightly dusted the potato strips with pure potato starch; these were without any doubt a lot crispier, but the crust ended up so thick and crunchy that it distracted from the pleasure of eating them.

3. I don’t boil my potatoes. I steam them.
In the original Triple Cooked Chips recipe, a lot of effort is made to drive off moisture. It doesn’t have to be like that. When I was in the process of developing my potato-and-gravy cupcakes for Britain’s Best Dish, I had trouble with the moisture content of boiled potatoes. To make a long story slightly less long, the solution was to steam the potatoes instead. As a bonus, this also means less of the potato’s flavour and nutrition leaks away into the boiling water. Not to worry, though, they’ll still be plenty unhealthy.

4. I don’t have a vacuum chamber – so I use the microwave instead.
You’ve likely got a microwave in your home kitchen, right? The Fat Duck Cookbook mentions the microwave as one of the methods considered to help dehydrate his chips – Heston discarded this method, not because it didn’t work, but because it was deemed “too inconsistent”, according to the book. I could only imagine this inconsistency being the result of the microwave heating up food unevenly. But guess what – it is possible to work around this. One can either cook at a lower power setting (which gives the heat more time to distribute through the food), or by nuking full blast for a while, rearranging the chips on the plate and blasting at full power again. The latter is the method I tend to use, and to good effect.

I’m aware there are other methods to drive off moisture from chips, but they invariably take a lot more time.

5. I don’t refrigerate or freeze my chips. Ain’t nobody got time for that!
After the chips are boiled, they are chilled in the fridge to make them firm enough to handle (and condensation helps drive off yet a bit more moisture). The chips are indeed very delicate when they’ve just been boiled or steamed. But with less moisture to begin with, a few extra cracks in the chips will only make them more crispy. So the chips go from steaming right into the microwave. As far as freezing is concerned, I do find that it improves the crust, but negatively impacts the texture of the interior. It seems to make the chips more starchy. Maybe due to ice crystals poking through the potato cell walls?

6. I don’t fry my chips in peanut oil – though I’m not opposed to it.
Peanut oil and sunflower oil are both great frying oils which are relatively flavour-neutral. Both of them have a high smoke point. If you can afford paying twice as much for your frying oil, I’d recommend frying in peanut oil – it is slightly higher in saturates and this results into crispier chips. I’d probably use peanut oil if I had a cook-off to win. But I otherwise I tend to use sunflower oil for flavour-neutral frying – Seriously, it’s fine.

7. I refuse to drench my chips in vinegar
Yeah yeah, Brits like their chips with salt and vinegar. Salt and sour. But the moment you splash vinegar over your chips, this will introduce moisture we’ve painstakingly tried to remove from the chips, and they’ll go soft in no time. It’s no wonder British chippies hardly ever serve crispy chips – most Brits wouldn’t be able to tell the difference anyway.

But it doesn’t have to be that way. That salt-and-vinegar flavoured bag of crisps you had a while back shows a solution. As it turns out, a bit of crystalline citric acid (E330) will go a long way – and you’ll find it at most Asian supermarkets. Alternatively, serve your chips with a dip by the side, such as ketchup or mayonnaise. Entire populations do.

By now, you’ll have a pretty good idea of the recipe we’ve arrived at. So without further ado, here it is, in all its glory.

Quintuple-cooked chips

Peel as many Maris Piper potatoes as you’d like to turn into chips. If you’re outside the UK, you might want to go for whichever potato is indicated for chips/fries in your country (start your search engines!).

marispiper_raw

Cut your potatoes into strips 12-15mm thick. Don’t worry about the edge pieces being slightly thinner – They’ll become extra crispy bonus bits for you. We’re going to steam them. If you have a steamer, this is your opportunity to use it for junk food. Otherwise, you might need to improvise a bit; I’ve used a metal sieve from the bargain shop, sitting just above boiling water. Maybe you’d get a Chinese bamboo steaming basket. If you can, spread out your chips into a single layer. I couldn’t, because I was too forgetful to do so.

marispiper_steamready

Put the cover on your steaming device and steam your potato strips until soft, 15-20 minutes (check with a fork).
marispiper_steaming

The chips should now be very fluffy and fragile.
marispiper_steamed

Carefully spread the chips out on a plate in a single layer, and microwave on full power for 90-120 seconds to drive off excess moisture. Rearrange the chips and repeat. They should now have slightly dried out and fluffed up a bit. You’ll probably break a few while handling them. Never mind – they’ll be delicious.
marispiper_postnuke1

Deep fry the chips in oil at 130°C until a pale crust begins to form. Do not overcrowd your cooking vessel – it’s far better to cook several small batches than one big one. This is because the moisture in the chips will keep the temperature of the oil down until the water is boiled off. If using a thermometer to control the temperature, you can keep an eye on the temperature; first it will drop to around 100°C and then slowly climb again. Once the temperature has climbed back to around 130-140°C, enough moisture should have evaporated that a slight crust can be felt while moving the chip around – about 5 minutes if your batch is small enough.

Once a batch has a pale crust, remove from the oil with a slotted spoon or similar and start the next batch. Drain briefly on kitchen paper, cooling rack, heat-proof colander or metal sieve (an excess of oil on the kitchen paper won’t help your chips to crisp up). By now you should be able to see the surface of the chips develop cracks and crevices (as visible in the centre chip below), and this will allow extraordinary crisp after the final fry.
marispiper_post130Cfry

Microwave the chips on full for another minute or two. Then either refrigerate them, or freeze them, if you must – but I’d suggest to finish frying them at 180°C until golden brown and crisp. During this browning stage, get them to that point where no amount of additional frying could possibly make them look any better. Briefly drain on kitchen paper, sprinkle with the best salt you have and optionally a bit of citric acid you want a bit of acidity; using liquid vinegar at this point would be a waste of perfectly good chips.

And there you have it – perfectly crispy/fluffy home made chips, cooked in under an hour from start to finish.

5xc_chips

And what if all this is still too much work? Surprisingly, some frozen chips are pretty decent. And if you’ve come this far, at least you’ll know what to look for.

** Heston Blumenthal has published several versions of his recipe over the years – my short description above is based on the Fat Duck Cookbook version. Alternate versions do not require a vacuum chamber but require extended cooling periods – an hour between every cooking stage. This includes the recipe published in “Total Perfection”, which prescribes frying at 190°C, and that in “Heston Blumenthal at home”, which suggests cutting the chips as much as 2 cm thick and returns to frying at 180°C for the browning stage. Apparently, even perfection isn’t set in stone.

Dalí’s olives

I’m a big fan of olives, but it hasn’t always been that way.

The first olive I ever had was a black olive. I must have been about six years old, and the olive topped a salad on an airplane to Asia, and I mistook it for a grape. As I popped it in my mouth, instead of the expected sweet flavour, my mouth was filled with a savoury, briny taste that was bad enough to put me off olives for the next decade-and-a-half.

But preferences change, and as I got more and more familiar with mediterranean food, I came to quite like them exactly because of that savoury, briny goodness they have to offer.

And then, one day around late September, I happened to be in Spain on holiday. Wikipedia claimed that olives should be just about in season at that time of year. And sure enough, I came across a fruiting olive tree on holiday, in the picturesque town of  Portlligat. I knew olives received some sort of treatment before they are suitable for eating, but wanted to learn more about this treatment and wondered just how bad it could be. So I did what anyone would do in my situation – I picked one and chewed down on it.

It reminded me of tea, infused for a few weeks. A meal of the strongest, most bitter grape seeds (yes, the seeds only!) you’ve ever had. Then of the time I sucked on the back of my ball point pen for too long, and got the sharp-tasting, gooey ink in my mouth, and couldn’t for the life of me wash away the horrid taste. It reminded me of the taste of leaky batteries. And the olives were worse than that.

So I tried another olive that had a bit more colour. As you do. It tasted at least as bad as the first one.

Clearly, I needed to learn more about prepping olives. So I foraged a few more olives around the area while we were waiting to get into the tourist attraction.

foraged_olives

After the formal tour, and after making sure I wasn’t breaking any rules, it seemed rude not to collect some more olives from Salvador Dalí’s own olive garden as well – they were a good bit smaller. And so I ended up with a pocket full of green and near-green, untreated olives.

Back at our temporary address, I looked up different methods of treating olives. The simplest method was to soak them in several changes of brine over the course of a few weeks. Though there wasn’t going to be enough of a holiday left to give the olives enough time to cure, this seemed realistic enough otherwise and at least worth a try. To speed up the process, I made an incision in every olive and soaked the raw, untreated olives in salt water with some dried parsley (which was strangely enough the only kind I could find).

brine_w_parsley

In hindsight, the parsley had little effect on the taste as I replaced the brine each morning. On the third morning, I braved up and tried a small olive. It was very, very bitter – but didn’t taste sharp. I kept changing the brine daily, sometimes twice a day, and added a small clove of garlic and a crushed, foraged bay leaf on the last few days and served the bowl of prepared olives alongside our meal on the last day.

olives_final_r

For some reason, no one in our group volunteered to have a taste. I tasted one and tried to convince myself, “They’re really not that bad anymore”. The bravest of our group members picked up an olive and said, “I’ll try”, ate one and proclaimed, with a contorted face, “Best olive I’ve ever had!”.

The verdict

Store-bought green olives take on a bleaker, yellowish hue when compared to olives that have only been brined for a few days – a bit like how a cucumber kept in the fridge too long loses some of its green colour over time. Store-bought olives are also a lot milder. Sure enough, they are kept in a brine until you buy them – and this much longer cure might have made good bit of difference.

Garlic and bay leaf definitely work as an olive seasoning, and I would happily choose this combination again.

It would have been interesting to try curing the olives with an alkaline – chemically, bitter/acrid tastes are often acids. Repeated changes of water or brine can draw out such flavours, but alkalines such as lye, soda crystals or bicarbonate of soda can chemically neutralize them and might allow for a quicker cure. I didn’t have these powders at hand for a side-by-side comparison on holiday. More experimenting is in order (though I suspect it will be difficult to source raw olives here in the UK).

Bitterness is being bred out of our foods. Foods used to be more bitter. We should embrace bitterness. It does add depth of flavour. A savoury note. Complexity. Be it in chocolate, coffee, beer or salads.

Well… possibly too much, in this case.

But one thing is for sure. These olives had character. They were, perhaps, as eccentric as the artist who owned the grove.

They were truly Dalí’s olives.

The big print giveth.

The small print takes it away.

There will something resembling a recipe on this page – but first I have a confession to make.

I am a label reader. (There. I said it).

Guess what? There are a whole lot of labels out there that try to get away with not telling the whole story – but they can’t get away with it, because of regulations. As far as I’m concerned, that’s good, because it gives me the tools to make informed choices. Here’s a nice example of what I consider less-than-fully-honest labeling.

STRAWBERRYflavourJELLY

Technically, everything on the label of this product is true. “No added sugar“, it starts. “Strawberry flavour“, it goes on.
On the back, my eyes are immediately drawn to the tick marks, which cheer,

Gluten free Fat free No artificial colours and flavours
No Added Sugar

By the time I get this far, my Common Sense is tingling (it’s like a super power), and I’m wondering what gluten has to do at all with jelly, and whether I should buy asbestos-free jelly instead.

Time to dig deeper and read the actual list of ingredients. Ingredients lists are heavily regulated. Regulations differ slightly from one country to another, but typically all ingredients must be listed, sorted descending by order of weight. As of February 2000, in the UK, if certain ingredients are considered key ingredients, percentages should be listed. Let’s have a look?

Ingredients:
Water,
Gelling Agents: Locust Bean Gum, Xanthan Gum, Gellan Gum,
Acid: Citric Acid,
Colours: Carmine, Anthocyanins,
Acidity Regulator: Potassium Citrate,
Flavourings,
Sweeteners: Aspartame; Acesulphame K.
Contains a source of Phenylalanine. Contains naturally occurring sugars.

Nothing too shocking in that list – Just plain old H2O, some flavourings, and a bunch of approved food additives colloquially known as E410, E415, E418, E330, E120, E163, E332, E951, E950. The phenylalanine is probably there due to the aspartame and my best guess is that the claim “naturally occurring sugars” refers to the thickening agents, which are technically polysaccharides – complex sugars. Molecular gastronomy is here!

I know what you’re thinking: Yum.

There are no percentages of anything in the ingredients list. By regulations, the best they could have done was say “Strawberry: 0%” but oops – it fell right off the bottom of the ingredients list because no strawberries were harmed in the making of this jelly.

But we can make educated guesses, starting near the top of the list. Some of our guesses can be based on regulation which prescribes the maximum allowed levels of food additives. This will provide different results from one country to another, depending on which regulation is in effect; In this case, as the product is being sold in the UK, the European rules apply, and these state quantum statis as maximum level for Locust bean gum; in other words, “as much as needed, but no more”. The next question then, is “how much is needed?” The regulation that applies in the United States, in this case, is more explicit on the maximum level Carob/Locust bean gum: it sets a maximum use level of 0.75% for jams, jellies and gelatins, but in practice 0.25% is typical.

By these guesstimates, this jelly consists of around 97.5% water. I’m willing to go as low as 90%, but that’s probably pushing it. In fact I could go a bit higher because the E-numbers are there in decreasing amounts. In any case, “the upper 90% range” should be a reasonable ballpark figure (I’ve just reasoned it, right?). But water isn’t a bad thing to consume.

And so, we’re left with a jelly that contains no useful nutrients, with the possible exception of the potassium citrate, which might help prevent kidney stones, which is clearly something every child should worry about.

Looking at the label, I can’t help but think I could be good at marketing. I’d have added more tick boxes: Naturally re-hydrates the body. Contains electrolytes. And I’m not sure if there’s a ten E-number limit or a rule against nutrients, but not having E300 in there clearly is a missed opportunity. A Good Source Of Vitamin C is worth having on the label. Just like those strawberries on there. I like strawberries. And I think there should be more tractors and cows on the label. Everybody loves tractors and cows.

Screenshot - 140915 - 19:54:07

That’s actually a good point. I guess I’ll have to leave marketing to the experts.

When it comes to strawberry jelly, we might ask ourselves, “Can we do better?”. The answer is a resounding Yes, we can! There will be setbacks. And false starts. There will be many who will disagree with some of the choices I make – I can’t solve every problem. But I will listen to you, especially when we disagree. Hm, that all sounds strangely familiar.

Less talk, more cooking. What I’m giving here is more of a general method than a precise recipe, you’re free to adapt it to your needs.

First, let’s break out our not-so-secret ingredient.
strawbs

Actual strawberries are a must for a strawberry flavour jelly. If you want the flavour to actually resemble that of strawberries, anyway.

As you may be able to see, some of these are a bit bruised – when you buy them by the box, you don’t usually get to pick and choose them one-by-one. The bruised bits can be cut off, or the entire berry can be discarded. If you see a box of strawberries and a few of them are bruised, that usually means that most of the box is at least ripe. And just smell those beauties! Give them a wash, get rid of the greens and slice them up.

step01

We’ll pop these strawberries in a saucepan (ideally stainless steel) and macerate them. What that means is that we’ll sprinkle them with a moisture-loving sweetening agent of our choice. For most of you, that would be plain old granulated sugar, but in the twisting kitchen, your food should adapt to you.

  • If you’re vegan, you’d likely use unrefined cane sugar.
  • If you’re worried about your teeth, use Xylitol. It also happens to be a known laxative, so use moderately until your body has adjusted to it.
  • If you’re about best flavour, use fructose. This would be my personal choice.
  • Low cal? Stevia might do it for you.

Soon you’ll see a pool of brightly-coloured strawberry juice forming at the bottom of your pan. Feel free to add a bit of water and apply a bit of heat now. Should you not have a stainless steel saucepan but you do have a Pyrex jug and a microwave, that’ll work too.

strawbjelly_step02

Once you’re happy that you won’t be getting much more juice out of the strawberries, strain and reserve the juice. And if you don’t like strawberries, use raspberries. Or blackberries. Or fruits that aren’t technically berries but that would taste nice in a jelly – strawberries come to mind.

strawbjelly_step03
Look at that colour. Clearly, there’s no need to add any food colouring to this stuff – neither plant-based anthocyanins nor bug-derived carmine. That’s good news for any of us who are veggie, have religious objections to eating bugs or those of you who are simply grossed out by that idea.

The resulting macerated, sweetened fruit juice is a great starting point for a number of preparations.

  • You can add water and have it as a drink.
  • You can reduce it into a syrup to pour over ice cream.
  • It can be fermented into wine
  • That wine can in turn be fermented into vinegar

But today, we’ll make jelly. And that doesn’t take much work. In my case I’d break out the agar powder as my gelling agent of choice; you might choose gelatin, or vege-gel, or any other gelling agent that strikes your fancy. You might even use a combination of E410, E415 and E418.

Once you’ve chosen your gelling agent, warm up the juice, dissolve the right amount of your chosen gelling agent (as per the instructions on the packet), then leave to cool and set in an appropriate container.

And… Presto!

strawbjelly_presto

I won’t argue that it is more work than buying a ready-made strawberry jelly. But it’s not just any strawberry jelly. The point is that this is a strawberry jelly tailored to your specific needs or demands. It can be veggie. It can be low GI. It will most certainly be Gluten Free (what was that label on about, anyway?). It can even be reasonably healthy. Compared to a jelly that’s optimized for the lowest possible mass-production cost, most importantly, ours will simply taste better.

Welcome to my blog.

Reference recipe:

Ingredients:

  • 250 grams of ripe strawberries
  • 50 grams fructose
  • 125 ml water
  • 1.25 grams agar-agar powder (more if a firmer jelly is desired)
Method:

  • Wash the fruit. Remove the greens and cut the strawberries in pieces. Place the strawberries in a stainless steel sauce pan.
  • Sprinkle over half the fructose. Stir and leave to macerate cold; A syrup will start to form at the bottom of the pan.
  • Add the water and bring to a boil. With a wooden spoon, smash the strawberries to the side of the pan until they are simmering in their own juice.
  • Pour the syrup through a sieve, leaving the pulp behind and rendering about 150ml of syrup. Taste it and adjust the sweetness as needed.
  • Pour the syrup back into the (rinsed) saucepan and add the agar powder. While stirring, bring back to a boil.
  • Place the syrup into a jelly mould (two if you make small servings) and leave to set in the refrigerator.

Episode II: A new blog

Hello and welcome to my brand new food blog. If you’ve arrived here from my previous blog, “One Pound Per Day”, welcome back!

I’ve started a new blog, because, although I very much enjoyed writing the previous one, I found it a bit limiting and I think in low-budget cooking there wasn’t much left to explore.

At the same time, “One Pound Per Day” was about overcoming limitations, and boy (or girl) there will be a lot of that here. I’ll do speed. I’ll do budget. I’ll do veggie. I’ll do gluten-free. And on occasion, I’ll even post recipes that nobody in their right mind would attempt to cook – you have been warned.

In contrast to my previous blog, this one will be fairly low bandwidth – I hope to post here every week or two. Do follow, it’ll be worth it.

Thank you.